Friday, October 2, 2015

It's More Than Just A Class!

Cottonseed Glory has dozens of exciting classes listed on our website.  There are classes for everyone: beginners to advanced, hand-sewers to machine quilters, quilters to bag-makers.  There is something for everyone.  Classes are important to take for several reasons: skills we learn in class go beyond the class description; trends in quilting are visible in the shop; different techniques can be utilized in other projects; and, perhaps most importantly, friendships with other quilters are made and kept!

The first class I took was about 7 years ago. I took a Baltimore Album appliqué class.  I didn't know how to hand applique, and my teacher was an expert.  She taught the class over the course of 12 months. We learned about stitches, thread, templates, needles, fabric and the characteristics of the Baltimore Album quilts.  Seven years later I'm still friends with many of the women I met in the class.  We meet once a month, still, and have show-and-tell and sew with each other for a few hours.  We have since moved into other projects other than the Baltimore Album quilts we were working on (well, some of us never finished those blocks), but if I hadn't taken this class I would have never met these wonderful quilters.

I encourage you to sign up for one of the classes at Cottonseed Glory.  Here is just a sample of some of the wonderful projects you can work on...and who knows who you might meet or be reunited with in class!!

New York Beauty with Pat Brousil on October 7
New York Beauty has to be on the bucket list of almost every quilter! Come learn from this wonderful paper piece technique from Pat Brousil and make some friends in the process!

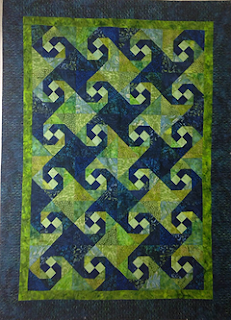
Octopus Garden on October 10
This is one of those classes where the techniques and tips you learn will be used in so many other projects.  Based on a "Snail's Tails" block, Pam Harrell's quilt is fun and impressive! Learn to play with color and learn some piecing tips.


Login Cabin: Watermelon or Traditional on October 22
Just when you think you know everything there is to know about log cabin quilts, a new slick technique is taught that helps with cutting accuracy and piecing perfection.  Pam Harrell's quilt can be made in so many colors.  This watermelon quilt is sure to please! And who doesn't love purple and green together?  


Gorgeous Feathered Star on October 21 and 28
Carolyn has worked at the shop for a long time, and her expertise really shines with this stunning feathered star quilt.  Learn how to make your own with Carolyn!


Artisitic Collage Quilt with Judy Shapiro on November 1
Judy is well known for her collage pieces, and this class will set your imagination on fire!
Imagine what you can do with this new skill!


Stack and Cut Village with Carolyn Jamieson on December 12
This quilt is right on trend.  Everyone wants to make these village quilts. Carolyn's technique of stacking and cutting many layers at once and then shifting the pieces around is sure to save time and is so much fun! Come get "shifty" on the 12th of December!

These are just a few samples of the classes that Cottonseed Glory offers.  Check our website for a complete list. Classes are a social experience that takes your creativity to a new level.  You see new fabric in the shop that perhaps your would have missed.  You experience other people's creativity and start thinking of new things you could do with your work.  You make friendships that can last a lifetime.  I know I did, and I'm so thankful for that!


Friday, August 21, 2015

Get ready for winter: Travel Sewing Kits

Here in Maryland, the humidity is high and the temps are even higher! But quilters start thinking about holiday projects around this time.  Our lists are long and the time it takes to get all of those handmade projects is something not to be taken lightly.  You have to be prepared to take projects with you wherever you go and work in small bursts of time to get everything finished. This got me to thinking: what do people do to be able to make their projects portable?

I've looked high and low on the web to gather some good pics to get you inspired and looked for some good tutorials too.

One Orange Giraffe's Blog has one of my favorite ideas.

The idea is simple and cheap.  She bought a "bucket boss" from Hope Depot for $7 (the liners that people use on construction jobs, plumbing, etc) for her craft station.  Those buckets are usually around $6. I can see this stuffed full of fabric, scissors, rulers, thread and all of the other stuff we quilters need.  Blocks could be easily rolled and stored in the center.  What an idea!  And making your own with some cute fabric would take it to the next level.  I see a trip to Cottonseed Glory for some supplies to fill this bucket in your future!

When a bucket isn't your style, you could follow A Place to Roost's lead and convert an adorable vintage suitcase into your traveling craft room.  Think of all of the hexie's you could fit in here...or the appliqué pieces!  Look at the detail of her collection of items: rotary cutters, scissors, thread, marking pens, acrylic rulers, cutting boards, bias makers, seam rippers, needles, pin cushion, fabrics and lots more.  I bet a small, portable iron would fit as well and the bottom of the suitcase could be a small ironing surface.  There are lots of notions (and of course, fabric) available at Cottonseed Glory that could get this kit ready for travel!

I need one of these!
But, maybe your don't have much space for your items and just need the bare minimum for a car trip.  Sew Many Way's TUTORIAL for this mini-travel sewing kit is awesome!
The perfect little sewing station for your car! 
Cottonseed Glory has lots of sewing-themed fabrics that would be perfect for this quick project!

Sometimes a simple little fabric bucket to throw-n-go is all you need.  Craftsy.com offers a free fabric bucket tutorial. 

This pattern calls for 1/2 yard of exterior and a fat quarter of interior fabric (and some interfacing).  Cottonseed Glory has lots to choose from.  You might want to make lots of buckets!

Cottonseed Glory has many patterns for bags that could also be converted into a travel sewing station, and lots of happy fabric that will get you inspired.  Stop in and get ready for the holidays! That list of gifts is piling up and those car trips, cruises and hotel stays are just the place to sit and sew!


Wednesday, June 10, 2015

No Fuss Rag Quilt Tutorial


This no fuss, no muss rag quilt looks complicated and impressive, but it's actually very easy.  Here is the list of materials you will need to make this quilt:

11 fat quarters

1 1/2 yards of coordinating solid fabric

49 pieces of batting cut at 4.5" x 4.5"

Ragging shears

Thread

Finished Quilt Size:
32" x 32"

Block Size: 6"


 Step 1:  Gather your 11 fat quarters and cut them into 6" x 6" squares.  You should be able to yield 9 squares from each fat quarter.  You will need 98 squares for the front and back of the quilt -- 49 on each side.

I like to fold three fat quarters together and cut them at the same time.  Start from the bottom, with the fold and cut three inches above.  Then trim at the top, six inches above.  With three fat quarters, this yields 27 6" squares! Continue this until your finished with all of your fat quarters.


Step 2:  Cut your middle layer of fabric and your batting 
Cut your middle layer of 49 6" squares. I usually choose white cotton, since it is going in the middle of the quilt to add the "fluffiness" of the ragging. But some people like to use flannel to get extra fluffy and some people like to use a coordinating color in the middle to make the ragged part very colorful.  Cut the batting of your choice into 49 4.5" squares.  I usually use scraps from other projects.

Step 3: Assemble the layers of your 49 blocks and quilt an "x" on each block
 Assemble your blocks like little quilt sandwiches: bottom face down, middle layer, batting, top layer face up.  This picture is just to show the layers.  The fabric edges should be lined up on top of each other.
 Be sure to center your batting between the blocks of fabric.  I like to randomly assemble all of the blocks, trying to make as many different combinations with the 11 fabrics as possible.

Chain piece the first part of the x across the blocks. Then cut apart your chain and quilt the other part of the x.

Step 4: Arrange your blocks in a random pattern, 7 across and 7 down.  
 I flip over the entire thing to make sure the back has a nice look to it.  Once I'm happy with the composition, I use post it notes to mark the rows and pin them to the first block on each row.  Then pile each row up and set them up at my sewing machine so I can chain piece the rows.
 I can finish a whole rag quilt in under 3 hours, from start to finish, because I chain piece at every step.

Step 5: Sew the seams at 5/8" (to allow room for ragging later on), bottom sides together, so the seams are on the top of the quilt.  Take care when you are getting the next piece to chain piece, that you are matching back side to back side.  Since the piles you have are top-side up!


You will have seven rows like this when you are finished

Step 6: Sew the rows together, locking the seams.  Then, zig zag stitch around the entire out edge of the quilt with approximately a 1" inch seem.

 This quilt is no fuss!!  If all of the layers don't line up perfectly from block to block, don't worry.  You are going to be cutting all of the exposed edges up.  It won't matter in the end.  Just lock the seams so the blocks line up with each row.

Step 7: Use your ragging shears to cut the quilt every 1/2" or so on every seam.  Be careful not to cut into your seam stitch or the zig zag stitch on the outer edge.  Don't try to use regular scissors, unless you want to end up in the looney bin!
Continue this until all seams have been "ragged"

Step 8: Wash the quilt and shake out the quilt very well (outside!) to get rid of the loose fibers from ragging.  After a couple of washes, the fibers will be very minimal.  
 This quilt has so many uses!

 A perfect picnic quilt for the kids or a baby shower gift!

This is the back. A nice view of the typical "x" quilting.


Here are a few of the examples I've made over the years.  This quilt is all about color and pattern, mixing polka dots and stripes, florals and geometrics in different colors makes it pop!


 Same technique used here, but longer strips and border. 


Thursday, April 30, 2015

For the Love of All Things Kaffe

Our Kaffe Fassett section at Cottonseed Glory is a definite bright spot in the shop!

One might say that Kaffe Fassett's career started on a train traveling to London when a fellow passenger taught him how to knit.  He had fallen in love with wool yarn and had just bought 20 colors of Shetland wool. His knitting style became almost instantly famous! His mastery of color and knitting led to him branching out to needlepoint and then eventually sewing and quilting.  His career has led him around the world and has enabled him to take part in too many projects to mention...like designing the sets and costumes for both the Northern Ballet Theatre and The Royal Shakespeare Company and publishing 20 books.  He frequently comes back to him home country (USA) and when he does, quilters scramble to sign up for one of his classes.

Kaffe Fassett's somewhat outrageous and bright fabrics are what draws many quilters to take the plunge and make a "kaffe quilt."  His fabric collections aren't what most quilters would consider collections at all; they are more individually designed fabrics that miraculously work together (as opposed to many collections that have several fabrics that where specifically designed to work together).  But once a quilter takes this leap of faith, the results are something to behold!  

There are several groups and fan pages out there on many social media outlets that can provide anyone with the inspiration needed to start a stash or build on one and to complete dozens of projects using Kaffe fabrics and some of the fabrics that are known to blend nicely with Kaffe (like Brandon Mably, Amy Butler and Martha Negley and Phillip Jacobs).

Here is some inspiration for you from around the Annapolis area and the web....

This incredible hand-appliqued quilt was made as a going-away gift for a special quilter.  The talented group of "sewists" used many Kaffe Fassett fabrics to achieve this bright and colorful look.
This amazing quilt was made by Alice Tignor, Miki Burgnon, Jo Ann Martin, Barbara Dicken, Diana Dunaway and Kelley Cunningham.  Quilted by Kelley Cunningham.

This block was sewn by Kelley Cunningham of Sun Porch Quilts.
This quilt shows the diversity of fabrics that can be used with Kaffe Fassett. Made by Julie Antinucci.
Kaffe Fassett fabrics make perfect zipper bags, like this one made by Francoise B using the pattern by S.O.T.A.K. Handmade.

Kelley Cunningham started this quilt during a class that she took with Kaffe Fassett.  She finished it some time later.  Lovely!!

Here are just a few of Kaffe Fassett's fabrics!  Come in to the shop to see what we have to offer!


So, what's your favorite Kaffe Fassett Fabric?  Mine is paperweight in just about any color! Leave a comment and let us know! Or leave your favorite link to some Kaffe "link-spiration"!